Search...
2. Creating Your 3D Catalogue
Generate or Upload 3D Product Models in Imersian
Create 3D models automatically using Imersian’s AI or upload your own for Shopify product visualisation.
This is where the transformation happens. With a single click, our AI analyzes your 2D images and constructs a spatial 3D model. This process turns a flat picture into an interactive experience, allowing customers to view the texture and shape of your product from every angle.
After the initial onboarding (during which we create 3D assets for all your active products), you can follow these steps whenever you add new products and after syncing the products as outlined in step 3.
On our paid plan, these are automated for daily syncs for fetching new products. Reach out at info@imersian.com to learn more.
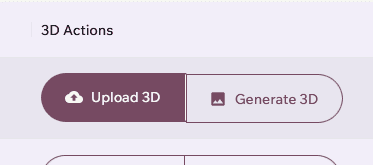
Create or Upload 3D Models
Understanding Statuses
DRAFT: The model has been created but is not yet visible to customers.
PROCESSING: Our servers are currently generating the 3D geometry or converting files. Please wait for this to finish.
PUBLISHED: The model is live and viewable in the 3D widget on your storefront.
Option A - Generating 3D Models from Images
If you don't have 3D files, our system can attempt to generate a 3D models using our AI using your existing Shopify product photos.
Navigate to the Manage Page
Go to the Manage page on the portal. This is where you can view and manage your product assets.Locate Newly Synced Products
Newly synced products will appear as Drafts.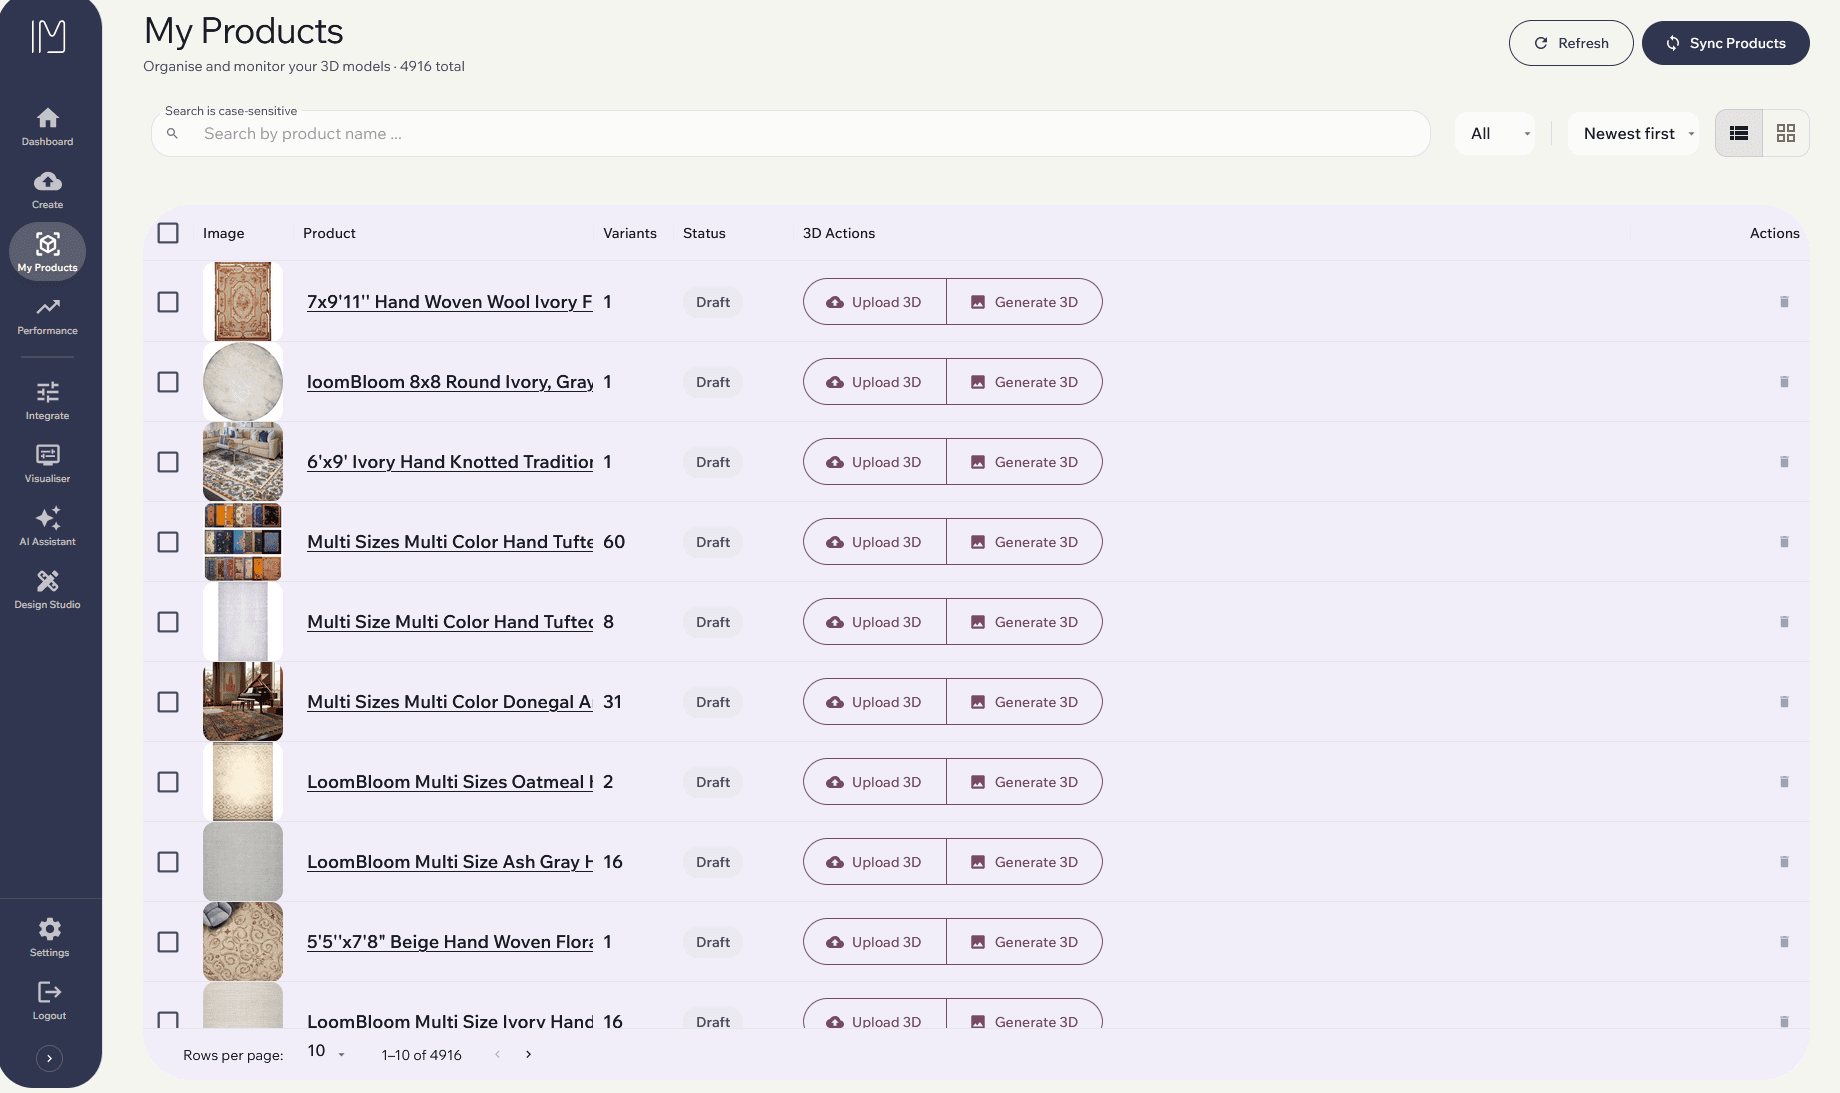
Create 3D Assets
Click the highlighted Generate 3D icon next to a draft product to begin generating 3D assets.
Assign Variant Images
In the pop-up window, you’ll see the product variants fetched from Shopify.
For each variant, select an image that will be used to generate the 3D model.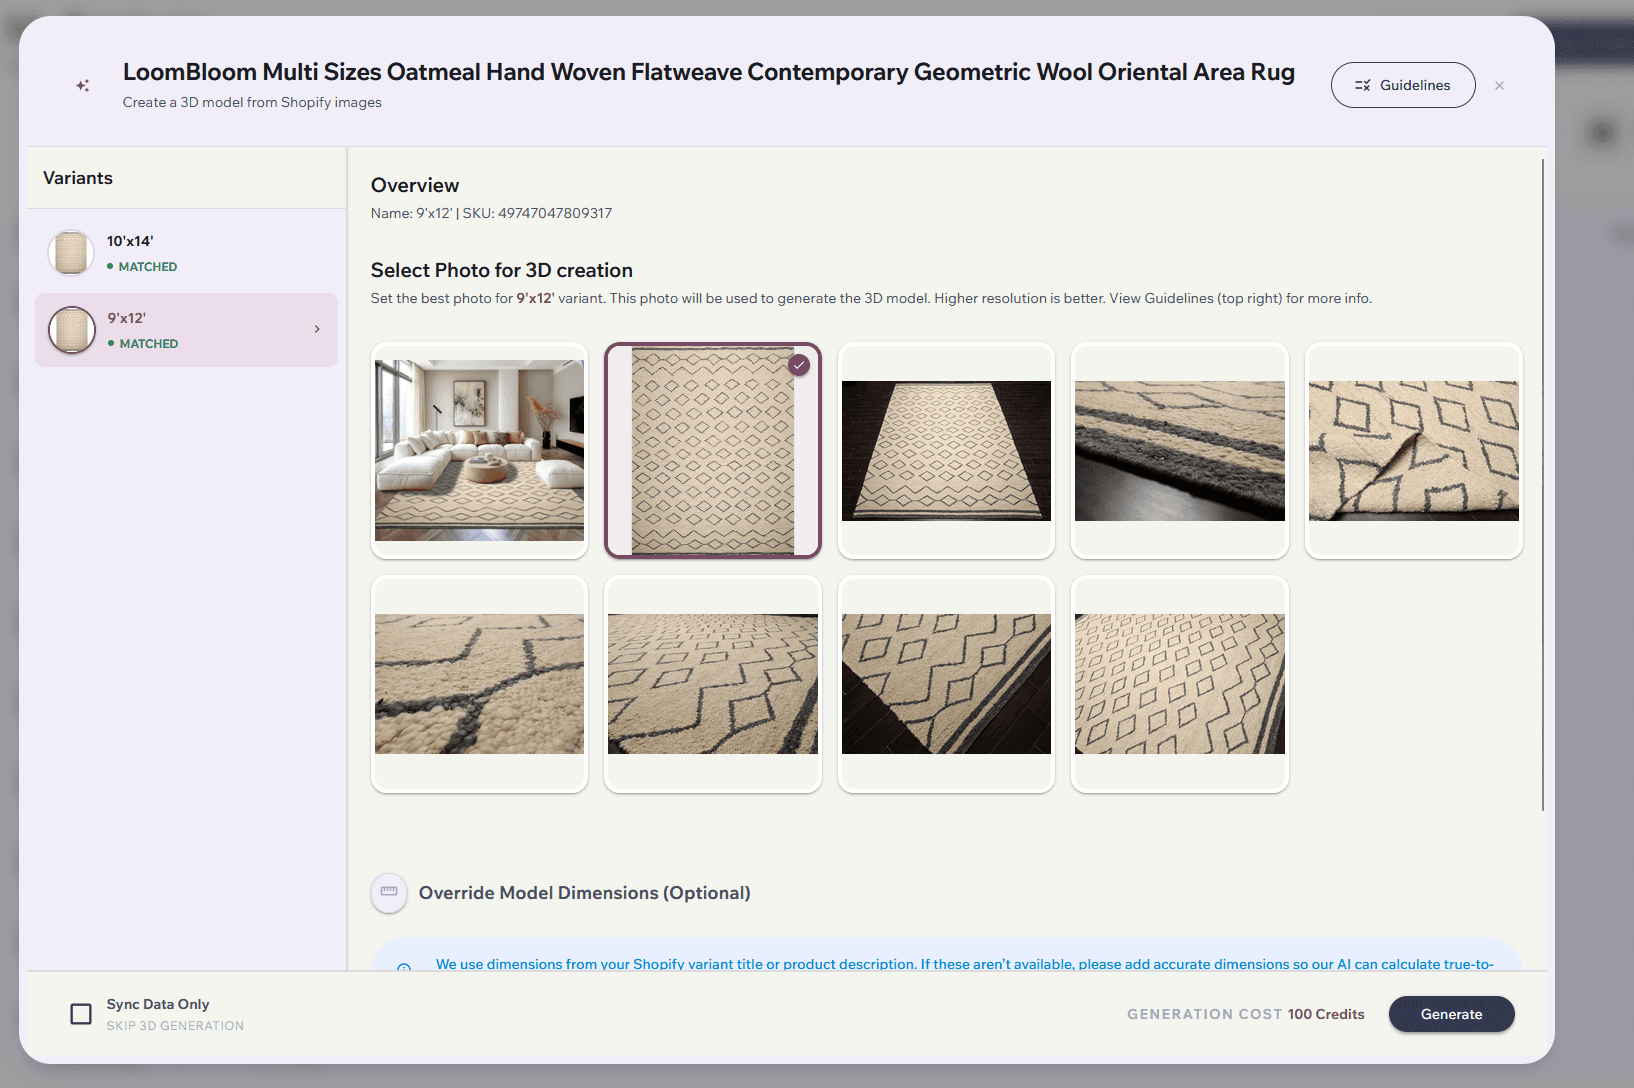
💡 Refer to our Image Guidelines for tips on selecting the best image.
Set Product Dimensions (Optional)
Product dimensions are automatically fetched from Shopify:From the variant title, if each variant has different dimensions.
From the product description, if all variants share the same size.
If dimensions are missing or incorrectly formatted, you can manually enter them here.
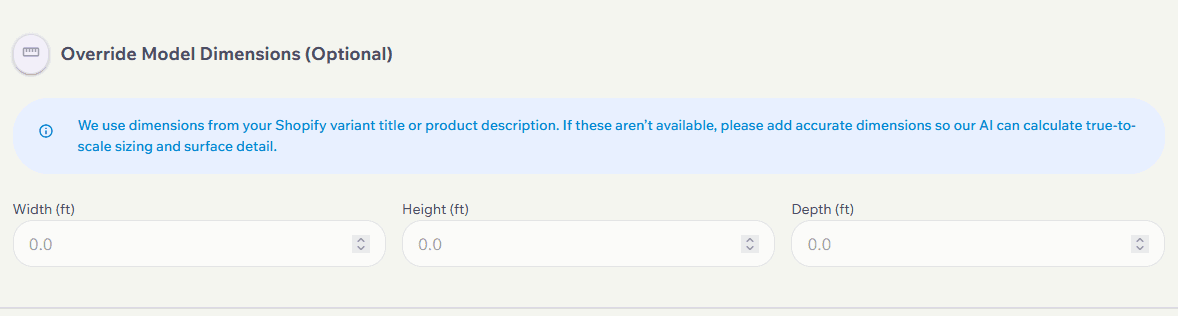
Leave the fields blank if the dimensions are already correct.
Dimension requirements:
Furniture: Provide all three dimensions (width, depth, height).
Rugs:
Height = pile height
Width = shorter side
Depth = longer side
Skip 3D Generation (Sync Only)
Use the Skip 3D Generation (Sync Only) checkbox if you’ve made updates to an existing Shopify listing (such as new variants or updated dimensions) and only need to sync changes for that product.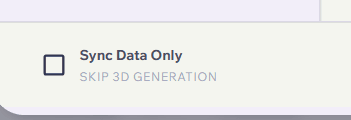
This is a faster alternative to running a full sync for all products.Generate Models
After selecting images and confirming dimensions, click Generate.
The product status will change to Processing , this may take several minutes depending on the complexity of the model and the number of variants.
You can repeat this process for other products while you wait.Publish
Once processing is complete and successful, refresh the page. The product will now be marked as Published.

Not Happy with the Result?
If your 3D model doesn’t look right, contact our support team. We’ll help with revisions or image improvements.
Option B: Already Have 3D Assets: Upload / Replace 3D Models
If you have custom high-quality 3D files (.glb) created by a designer, you can upload them directly. Our system handles complex products with multiple variants (e.g., a table that comes in White, Gray, and Black).
Locate Newly Synced Products
Newly synced products will appear as Drafts.Sync Shopify Data
Click the highlighted Create icon next to a draft product to begin generating 3D assets.Enable Skip 3D Generation (Sync Only) **IMPORTANT**
Use the Skip 3D Generation (Sync Only) checkbox if you’ve made updates to an existing Shopify listing (such as new variants or updated dimensions) and only need to sync changes for that product.Click the Sync Data button on the product tile.
Once the Sync is complete the Product Status will be set to 'Missing 3D'. We will upload them in the next step
How to Upload / Replace a Model
Click the Upload 3D Model icon on the product card.
Review Variants: A window will open listing all the variants for that product.
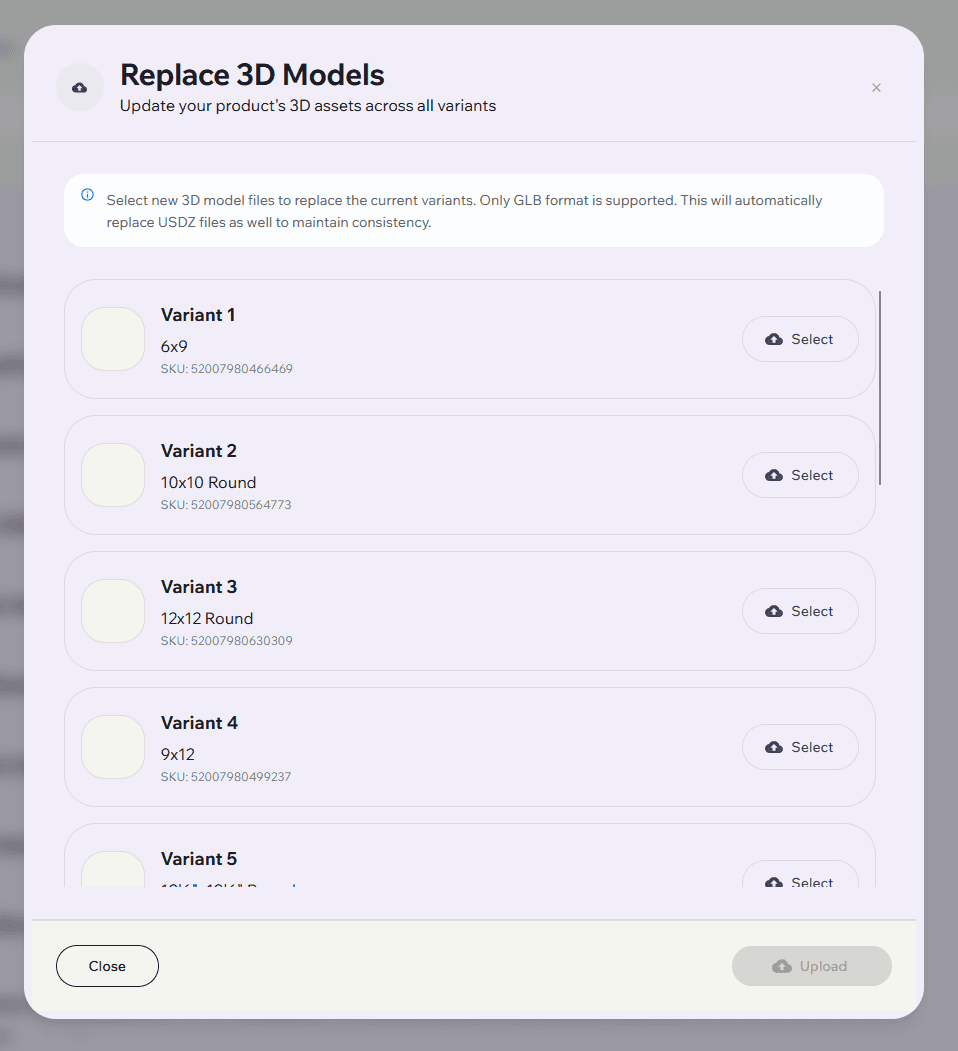
We automatically sync with Shopify to show you the Variant Name and Thumbnail Image so you know exactly which file goes where.
Example: You will see "Variant 1: Blue Sofa" with a picture of the blue Blue Sofa.
Select Files: Click Select next to the specific variant you want to update and choose your
.glbfile.Note: You can update just one variant or all of them at once.
Upload: Click the Upload button.
Progress: A progress bar will appear.
Important: Do not close the window or refresh the page while the upload is in progress.
The system will upload your GLB file and automatically generate the Apple-compatible (USDZ) file for iPhone users.
Success: Once the bar hits 100%, the modal will close, and your product status will update to PUBLISHED.
Once uploaded, the system will automatically generate .USDZ files for iOS compatibility.
Reviewing and Managing 3D Assets
Once your 3D models have been generated or uploaded, follow these steps to review and manage them.
Click a product thumbnail to preview the 3D model.
Ensure the product is marked as Published.
Confirm it is active in your Shopify store.
Products That Will Be Processed
Our AI-based 3D generation system currently supports specific product types. Products will be processed automatically if they:
Have a top-down image (for rugs) or a plain white background (for furniture or wall art).
Products are Furniture, Wall Art, or Rugs.
(Our AI does not currently support other product types. You may upload your own models if needed.)Include dimension information in product options.
Are active in your Shopify store.
Have complete and accurate product information.
Troubleshooting
Products Aren’t Being Processed?
Check the following before contacting support:
Product Tag: Ensure the product has the tag
imersianvisualiserenabled.Image Quality: The image should clearly show the product (top-down for rugs, front-facing for furniture/wall art). please follow the Image Guidelines.
Dimensions: Confirm that product dimensions are included in the product options and are correctly formatted.
Credits: Verify you have available 3D generation credits. You can purchase additional credits from the Billing page.
Frequently Asked Questions
Q: Why don't the variant names in the uploader match my Shopify store?
A: The uploader tries to match your Shopify variants by their unique SKU. If your SKUs are missing or have changed, it tries to match them by the order they appear in the list. Ensure your Shopify variants have SKUs for the most accurate matching.
Q: I uploaded a GLB file, do I need to upload a USDZ file too?
A: No. Our system automatically converts your .glb file into .usdz format for Apple AR Quick Look support. You only need to provide the GLB.
Q: Can I close the window while it says "Processing"?
A: No. If you are in the "Upload/Replace" window, please keep it open until the progress bar completes. Closing it early may result in a model being stuck in "Draft" mode or missing files.
Q: Why is my thumbnail missing?
A: If a variant doesn't have an image assigned in Shopify, we will try to show a snapshot of the 3D model. If neither exists yet, a default placeholder will be shown. Assigning images to variants in Shopify is the best way to keep your dashboard organised.
Still Need Help?
If you’ve checked everything and are still having issues, please contact the Imersian Support Team, we’re happy to assist. Reach out to the Imersian team for assistance